
How to secure AWS Api Gateway Requests with Signature Version 4 using AWS Amplify?
Learn how to use AWS Amplify to sign your API Gateway requests with Signature Version 4.
It is important to secure your API Gateway endpoints. One of the ways is to use AWS IAM roles (AWS_IAM). If there is no authorization to your API Gateway endpoints, your API endpoints could be misused / attacked easily via a script or using curl etc.
Note that using AWS Amplify to sign a request doesn’t require you to specify your secret access key on front end which is definitely safer than using a library that requires one.
Possible Issues
Without securing my endpoints, these were the issues that I encountered when I started building APIs.
-
Sometimes, service was down because it was overloaded with spikes of bad requests.
-
My bill increased because of my service that depends on other paid services was misused by my users or my competitors.
-
Email reputation went down. Sharing via email service was misused and it caused high email bounce rate.
I learnt my lesson and I would like to share it with you.
Signature Version 4 Simplified
There are 4 steps involved in signing AWS requests with Signature Version 4. You can find more information on this AWS document. The following steps are quoted and summarized based on the linked AWS document.
1) Create a Canonical Request
Create a string that includes HTTP request information in a standardized (canonical) format.
- Canonical Request pseudocode:
CanonicalRequest =
  HTTPRequestMethod + '\n' +
  CanonicalURI + '\n' +
  CanonicalQueryString + '\n' +
  CanonicalHeaders + '\n' +
  SignedHeaders + '\n' +
  HexEncode(Hash(RequestPayload))
- Example Get Request to API Gateway endpoint:
GET https://f1pj1.execute-api.us-east-1.amazonaws.com/v0/posts?user=x HTTP/1.1
Host: f1pj1.execute-api.us-east-1.amazonaws.com
Content-Type: application/x-www-form-urlencoded; charset=utf-8
X-Amz-Date: 20190321T123600Z
X-Amz-Date time stamp header must be in UTC and in ISO 8601 format: YYYYMMDD'T'HHMMSS'Z'. The timestamp is used to make sure that the issued credential scope matches the date of the request.
- Example Canonical Request string. This string can be hashed with the same algorithm that is used to hash the payload.
GET
/Prod/posts
user=x
content-type:application/x-www-form-urlencoded; charset=utf-8
host:f1pj1.execute-api.us-east-1.amazonaws.com
x-amz-date:20190321T123600Z

content-type;host;x-amz-date
e3b0c44298fc1c149afbf4c8996fb92427ae41e4649b934ca495991b7852b855
- Example hashed Canonical Request string:
f536975d06c0309214f805bb90ccff089219ecd68b2577efef23edd43b7e1a59
2) Create a String to Sign for Signature Version 4
The string to sign has meta information about your request and the canonical request that is created in step 1. Concisely, it includes the algorithm, date and time, credential scope, and hashed canonical request.
- Structure of string to sign:
StringToSign =
    Algorithm + \n +
    RequestDateTime + \n +
    CredentialScope + \n +
    HashedCanonicalRequest
- Example string to sign:
AWS4-HMAC-SHA256
20190321T123600Z
20190321/us-east-1/execute-api/aws4_request
f536975d06c0309214f805bb90ccff089219ecd68b2577efef23edd43b7e1a59
3) Calculate Signature
- Derive a signing key from your AWS secret access key, date(YYYYMMDD), region, service. This is the pseudocode for deriving a signing key:
kSecret = your secret access key
kDate = HMAC("AWS4" + kSecret, Date)
kRegion = HMAC(kDate, Region)
kService = HMAC(kRegion, Service)
kSigning = HMAC(kService, "aws4_request")
HMAC stands for hash-based message authentication code.
- Use derived signing key and the string to sign to create the signature. This is the pseudocode to calculate the signature:
signature = HexEncode(HMAC(derived signing key, string to sign))
- For client requests, you may not want to use your secret access key to sign your requests as the key will be accessible to anyone who inspect the source code. Instead, you can use AWS Security Token Service to use temporary security credentials to sign a request.
For example, if you use AWS Cognito, you can create two roles: unauthenticated for not-sign-in users and authenticated roles for sign-in users. These roles have 1 hour lifetime by default. You can get more information on AWS Using IAM Roles document
Following information is quoted from this AWS Signature V4 document.
You can use temporary security credentials provided by the AWS Security Token Service (AWS STS) to sign a request. The process is the same as using long-term credentials.
4) Add Signature to HTTP Request
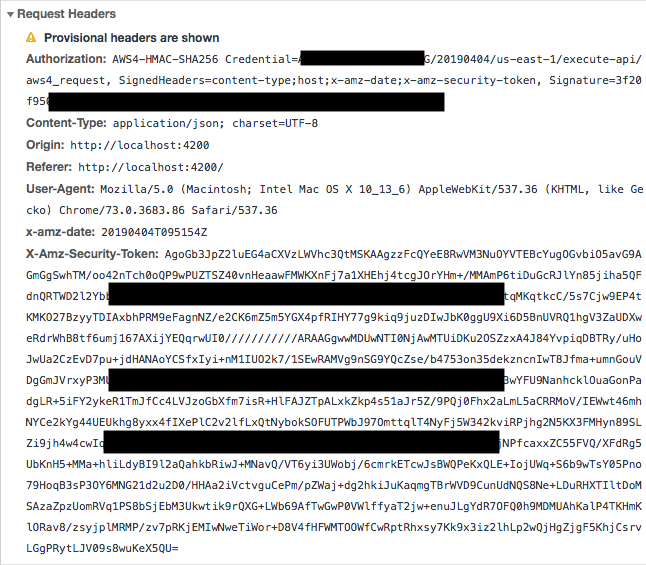 You can see from the above screenshot that Signature is added to the HTTP Request’s Authorization Header in the following format:
- Pseudocode of the Authorization header:
Authorization: algorithm Credential=access key ID/credential scope,
SignedHeaders=SignedHeaders, Signature=signature
- Example of Authorization header:
Authorization: AWS4-HMAC-SHA256 Credential=AKIDEXAMPLE/20190321/us-east-1/execute-api/
aws4_request, SignedHeaders=content-type;host;x-amz-date,
Signature=5d672d79c15b13162d9279b0855cfba6789a8edb4c82c400e06b5924a6f2b5d7
- Request would like this
GET https://f1pj1.execute-api.us-east-1.amazonaws.com/Prod/posts?user=x HTTP/1.1
Authorization: AWS4-HMAC-SHA256 Credential=AKIDEXAMPLE/20150830/us-east-1/\
execute-api/aws4_request, SignedHeaders=content-type;host;x-amz-date, \
Signature=5d672d79c15b13162d9279b0855cfba6789a8edb4c82c400e06b5924a6f2b5d7
content-type: application/x-www-form-urlencoded; charset=utf-8
host: f1pj1.execute-api.us-east-1.amazonaws.com
x-amz-date: 20190321T123600Z
Good to Know
You can read this AWS document about difference between Signature Version 2 and Version 4.
Code
There are several ways to sign an API Gateway request. For example, you can use aws4, aws-signature-v4, AWS Amplify etc for the signing process. This article is mainly going to talk about how to use AWS Amplify to sign a request.
API Class + Axios
When you use AWS Amplify, you can use API Class directly to send requests and all these requests are automatically signed using AWS Signature Version 4.
Note that at the moment of this article is written, only json response type is supported by Amplify. Subscribe to this GitHub pull request to get notified when other response type is supported.
Amplify Configuration
You have to configure Amplify before you use API class.
Amplify.configure({
  // If you use Cognito
  Auth: {
    identityPoolId: '',
    region: '',
    userPoolId: '',
    userPoolWebClientId: ''
  },
  API: {
    endpoints: [
      {
        name: 'Compute',
        endpoint: 'https://api.amazonaws.com/v0'
      }
    ]
  }
});
Get request example
function compute(user) {
  const apiName = 'Compute';
  const path = '/computer-one';
  const config = {
    headers: {},
    response: false,
    queryStringParameters: {
      'id': user.id,
    }
  }

  return API.get(apiName, path, config)
    .then(res => {
      console.log('compute response: ', res);
      if (res.rst === 'OK') {
        return Promise.resolve(res['answer']);
      } else {
        return Promise.reject();
      }
    }).catch(error => {
      console.error(error);
      return Promise.reject();
    });
}
Post Request Example
function compute(user) {
  const apiName = 'Compute';
  const path = '/computer-one';
  const config = {
    headers: {},
    response: false,
    queryStringParameters: {
      'id': user.id,
    },
    body: {
      'data': data
    }
  }

  return API.post(apiName, path, config)
    .then(res => {
      console.log('compute response: ', res);
      if (res.rst === 'OK') {
        return Promise.resolve(res['answer']);
      } else {
        return Promise.reject();
      }
    }).catch(error => {
      console.error(error);
      return Promise.reject();
    });
}
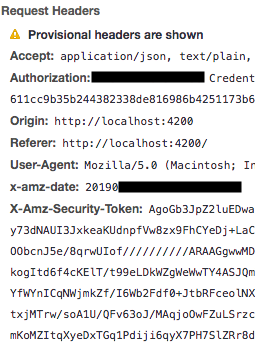
This is a screenshot of cropped request headers.
Signer Class + Fetch / XHR
On the other hand, if you prefer to use Fetch or XHR, you can also import Signer from from @amplify/core and use it to sign your request directly.
The following is the function to sign requests. Note that part of the code is adopted from AWS Amplify library.
import Auth from '@aws-amplify/auth';
import { Signer } from '@aws-amplify/core';
import * as urlLib from 'url';

url = 'yourApiGatewayEndpoint';
// sign a request using Amplify Auth and Signer
function signRequest(url, data) {
  // the urlLib code is adopted from Amplify Rest Client
  const { search, ...parsedUrl } = urlLib.parse(url, true, true);
  let formattedUrl = urlLib.format({
    ...parsedUrl,
    query: { ...parsedUrl.query }
  });

  // set your AWS region and service here
  const serviceInfo = {
    region: 'us-east-1', service: 'execute-api'
  }

  return Auth.currentCredentials()
    .then(credentials => {
      let cred = auth.essentialCredentials(credentials);

      return Promise.resolve(cred);
    })
    .then(essentialCredentials => {
      let params = {
        headers: { /* request headers */ },
        data: JSON.stringify({
          'd': data
        }),
        method: 'POST',
        url: formattedUrl
      }

      // cred object keys must stay the same so that
      // Signer.sign function can access the keys
      let cred = {
        secret_key: essentialCredentials.secretAccessKey,
        access_key: essentialCredentials.accessKeyId,
        session_token: essentialCredentials.sessionToken
      }

      // Signer.sign takes care of all other steps of Signature V4
      let signedReq = Signer.sign(params, cred, serviceInfo);

      return Promise.resolve(signedReq);
    });
}
The following is a function that uses the above signing function to sign a request and use Fetch to send the requests.
function compute = (input, data) => {
  // append query paramaters and values here.
  let url = `${this.url}?param1=${input}`;

  return this.signRequest(url, data)
    .then(signedRequest => {
      return fetch(signedParams.url, {
        method: 'POST',
        mode: 'cors',
        cache: 'no-cache',
        headers: signedParams.headers,
        referrer: 'client',
        body: signedParams.data
      })
    })
    .then(response => {
      if (response.ok) {
        return Promise.resolve(response.json());
      } else {
        throw new Error('Failed Request');
      }
    })
    .catch(error => {
      return Promise.reject(new Error());
    });
}
Summary
With this, you can secure your AWS API Gateway endpoints with AWS_IAM and sign your AWS API Gateway requests with Signature Version 4. Note that it doesn’t shield your APIs from all misuse but it makes it harder to misuse.
In addition, you can also use Cognito or Lambda Authorizer (Custom Authorizer) to control access to your API Gateway endpoints. Read how to do it on my API Gateway Access Control article.
Support Jun
Thank you for reading! ![]() Support Jun
Support Jun
If you are preparing for Software Engineer interviews, I suggest Elements of Programming Interviews in Java for algorithm practice. Good luck!
You can also support me by following me on Medium or Twitter.
Feel free to contact me if you have any questions.


Comments