
AWS Elastic Beanstalk Worker Auto Scaling By Queue Size
Learn how to configure AWS Elastic Beanstalk worker instances to auto scale based on the number of messages in the associated worker queue (queue size / queue depth).
Elastic Beanstalk Auto Scaling Metrics
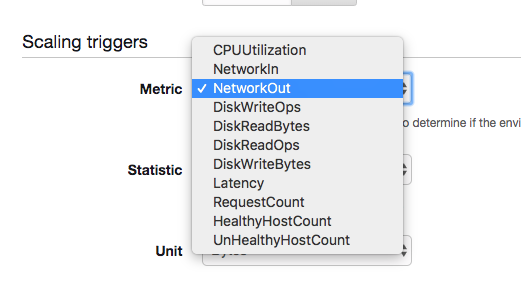
You can see available auto scaling metric options in the images below. None of them is worker queue size / depth. Thus, you need to configure worker environment using a config file to auto scale worker instances by worker queue size.
Scaling Trigger metrics:
Auto Scaling On Queue Size
Follow the steps below to configure your Elastic Beanstalk(EB) worker to auto scale based on queue size.
1. Load Balanced
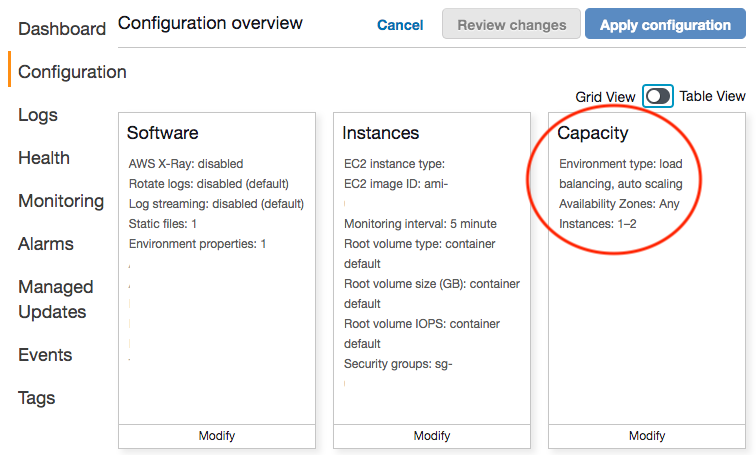
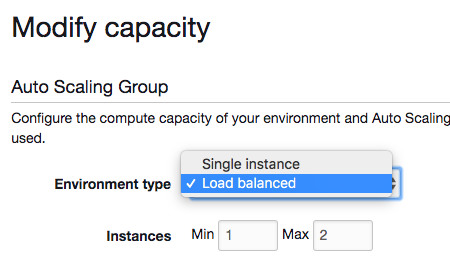
Make sure you have your worker capacity set as Load balanced environment type.
AWS Console
Through AWS Elastic Beanstalk Console, you can go to your EB environment and select Configuration menu and Capacity item to change your worker environment type to ‘Load balanced’ if it is not.
Using Elastic Beanstalk CLI
You can use eb scale to change environment type to ‘Load balanced’ and scale your environment to run on a specified number of instances.
eb scale syntax:
$ eb scale number-of-instances

$ eb scale number-of-instances environment-name
If you are a using a single instance environment type, you can run eb scale 1 myEnvName to change it to ‘load balanced’. Choose Y for the question prompt to change EB worker environment type.
$ eb scale 1 myEnvName
The environment is currently a single-instance.
Do you want to change to a load-balancing environment?
WARNING: If you choose yes, the environment and your application
will be temporarily unavailable.
(Y/n):
2. Worker Environment Config
You can check your worker environment’s config by running eb config and you will see information like this.
ApplicationName: app-name
DateUpdated: 2019-08-07 07:29:17+00:00
EnvironmentName: environment-name
PlatformArn: arn:aws:elasticbeanstalk:us-west-1::platform/Python 3.6
  running on 64$ Amazon Linux/2.8.1
settings:
  AWSEBAutoScalingScaleDownPolicy.aws:autoscaling:trigger:
    LowerBreachScaleIncrement: '-1'
  AWSEBAutoScalingScaleUpPolicy.aws:autoscaling:trigger:
    UpperBreachScaleIncrement: '1'
  AWSEBCloudwatchAlarmHigh.aws:autoscaling:trigger:
    UpperThreshold: '6000000'
  AWSEBCloudwatchAlarmLow.aws:autoscaling:trigger:
    BreachDuration: '5'
    EvaluationPeriods: '1'
    LowerThreshold: '2000000'
    MeasureName: NetworkOut
    Period: '5'
    Statistic: Average
    Unit: Bytes
...
These 4 options: AWSEBAutoScalingScaleDownPolicy, AWSEBAutoScalingScaleUpPolicy, AWSEBCloudwatchAlarmHigh, AWSEBCloudwatchAlarmLow from aws:autoscaling:trigger namespace are added when the worker environment type is ‘Load balanced’.
LowerBreachScaleIncrement item defines the number of Amazon EC2 instances to be removed when scaling down.
UpperBreachScaleIncrement item defines the number of Amazon EC2 instances to be added when scaling up.
BreachDuration = Period * EvaluationPeriods is the formula that determines how long a trigger’s metric can remain beyond its specified limits before scaling is triggered. For example, if BreachDuration value is 5, that means if the trigger metric goes beyond or below specified limit within 5 minutes, scaling will be triggered.
BreachDuration is the amount of time, in minutes, a scaling trigger metric can be beyond its specified limit before scaling is triggered.
Period is the amount of time, in minutes, between two consecutive evaluation periods. In other word, it is the frequency of Amazon CloudWatch measures the trigger metric.
EvaluationPeriods is the number of consecutive evaluation periods used to determine if scaling needs to be triggered.
3. Auto Scaling on Queue Size Config
Choose one of the following configuration settings depending on your worker queue type.
Default Worker Queue
If you use a default worker queue, you can use "Fn::GetAtt": ["AWSEBWorkerQueue", "QueueName"] to retrieve your queue name. Thus, the following config file would be able to scale your default worker queue by queue size.
Modify Period, EvaluationPeriods and Threshold values to suit your use cases.
You may notice that AWSEBCloudwatchAlarmHigh and AWSEBCloudwatchAlarmLow are the alarms that you can when you run eb config. Thus, the following setting make these alarms do nothing. Instead, it defines two new alarms to scale worker instance up and down based on upper and lower thresholds.
You can create a environment config file called worker-scale-on-queue-size.config with following settings and place the file inside .ebextensions/ folder of your Elastic Beanstalk application folder. File name is not important. After that, deploy your application with this new config file.
Resources:
  AWSEBCloudwatchAlarmHigh:
    Type: AWS::CloudWatch::Alarm
    Properties:
      AlarmActions: []

  AWSEBCloudwatchAlarmLow:
    Type: AWS::CloudWatch::Alarm
    Properties:
      AlarmActions: []

  QueueSizeAlarmHigh:
    Type: AWS::CloudWatch::Alarm
    Properties:
      AlarmDescription: "Scale up when queue has more than 30 messages"
      Namespace: "AWS/SQS"
      MetricName: ApproximateNumberOfMessagesVisible
      Dimensions:
        - Name: QueueName
          Value: { "Fn::GetAtt": ["AWSEBWorkerQueue", "QueueName"] }
      Statistic: Sum
      Period: 300
      EvaluationPeriods: 1
      Threshold: 30
      ComparisonOperator: GreaterThanThreshold
      AlarmActions:
        - Ref: AWSEBAutoScalingScaleUpPolicy

  QueueSizeAlarmLow:
    Type: AWS::CloudWatch::Alarm
    Properties:
      AlarmDescription: "Scale down when queue has less than 5 messages"
      Namespace: "AWS/SQS"
      MetricName: ApproximateNumberOfMessagesVisible
      Dimensions:
        - Name: QueueName
          Value: { "Fn::GetAtt": ["AWSEBWorkerQueue", "QueueName"] }
      Statistic: Sum
      Period: 300
      EvaluationPeriods: 1
      Threshold: 5
      ComparisonOperator: LessThanThreshold
      AlarmActions:
        - Ref: AWSEBAutoScalingScaleDownPolicy
This environment configuration settings is available via Elastic Beanstalk Samples on GitHub.
Note that for auto scaling verification purpose, you can set QueueSizeAlarmHigh Period as 60, EvaluationPeriods as 1 and Threshold as 1. You can set QueueSizeAlarmLow Period as 60 and EvaluationPeriods as 1 and Threshold as 0. This will trigger a creation of a new worker instance when there is a message in the queue within a minute. Note that AWS::CloudWatch::Alarm Period is in seconds.
Non-default Worker Queue
If you use your own AWS SQS queue, you can either set Value for QueueName item as your queue name. For example, if your queue name is ‘my-queue’, you can change the config above to
Dimensions:
  - Name: QueueName
    Value: "my-queue"
If not, you can use the following config to retrieve your worker queue using AWS CloudFormation intrinsic functions, namely ‘Fn::Select’, ‘Fn::Split’ and ‘Fn::GetOptionSetting’ functions.
You can create a environment config file called worker-scale-on-queue-size.config with the following settings and place the file inside .ebextensions/ folder of your Elastic Beanstalk application folder. File name is not important. After that, deploy your application with this new config file.
Resources:
  AWSEBCloudwatchAlarmHigh:
    Type: AWS::CloudWatch::Alarm
    Properties:
      AlarmActions: []

  AWSEBCloudwatchAlarmLow:
    Type: AWS::CloudWatch::Alarm
    Properties:
      AlarmActions: []

  QueueSizeAlarmHigh:
    Type: AWS::CloudWatch::Alarm
    Properties:
      AlarmDescription: "Scale up when queue has more than 30 messages"
      Namespace: "AWS/SQS"
      MetricName: ApproximateNumberOfMessagesVisible
      Dimensions:
        - Name: QueueName
          Value:
            "Fn::Select":
              - 4
              - "Fn::Split":
                - '/'
                - "Fn::GetOptionSetting":
                    Namespace: "aws:elasticbeanstalk:sqsd"
                    OptionName: "WorkerQueueURL"
      Statistic: Sum
      Period: 300
      EvaluationPeriods: 1
      Threshold: 30
      ComparisonOperator: GreaterThanThreshold
      AlarmActions:
        - Ref: AWSEBAutoScalingScaleUpPolicy

  QueueSizeAlarmLow:
    Type: AWS::CloudWatch::Alarm
    Properties:
      AlarmDescription: "Scale down when queue has less than 5 messages"
      Namespace: "AWS/SQS"
      MetricName: ApproximateNumberOfMessagesVisible
      Dimensions:
        - Name: QueueName
          Value:
            "Fn::Select":
              - 4
              - "Fn::Split":
                - '/'
                - "Fn::GetOptionSetting":
                    Namespace: "aws:elasticbeanstalk:sqsd"
                    OptionName: "WorkerQueueURL"
      Statistic: Sum
      Period: 300
      EvaluationPeriods: 1
      Threshold: 5
      ComparisonOperator: LessThanThreshold
      AlarmActions:
        - Ref: AWSEBAutoScalingScaleDownPolicy
Note that for auto scaling verification purpose, you can set QueueSizeAlarmHigh Period as 60, EvaluationPeriods as 1 and Threshold as 1. You can set QueueSizeAlarmLow Period as 60 and EvaluationPeriods as 1 and Threshold as 0. This will trigger a creation of a new worker instance when there is a message in the queue within a minute. Note that AWS::CloudWatch::Alarm Period is in seconds.
CloudFormation Intrinsic Functions Explained
Fn::GetOptionSetting gets the value of worker environment configuration option setting.
Fn::Split splits a string into a list of string by a delimiter.
Fn::Select selects a specific item in a list.
Below is the signature of Fn::GetOptionSetting. Note that a worker environment’s WorkerQueueURL is available via aws:elasticbeanstalk:sqsd namespace.
"Fn::GetOptionSetting":
  Namespace: "namespace"
  OptionName: "option name"
  DefaultValue: "default value"
An AWS SQS url looks like this https://sqs.country-region-number.amazonaws.com/account-numer/queue-name. Thus, when we use ‘Fn::Split’, queue-name will be the fifth item and thus can be retrieved using ‘Fn::Select’ with index 4.
Auto Scaling Verification
After you deploy your worker instance with auto scaling based on queue size config file, you can use AWS CLI or EB CLI to verify if your worker instances auto scale. You can also check AWS EC2 console.
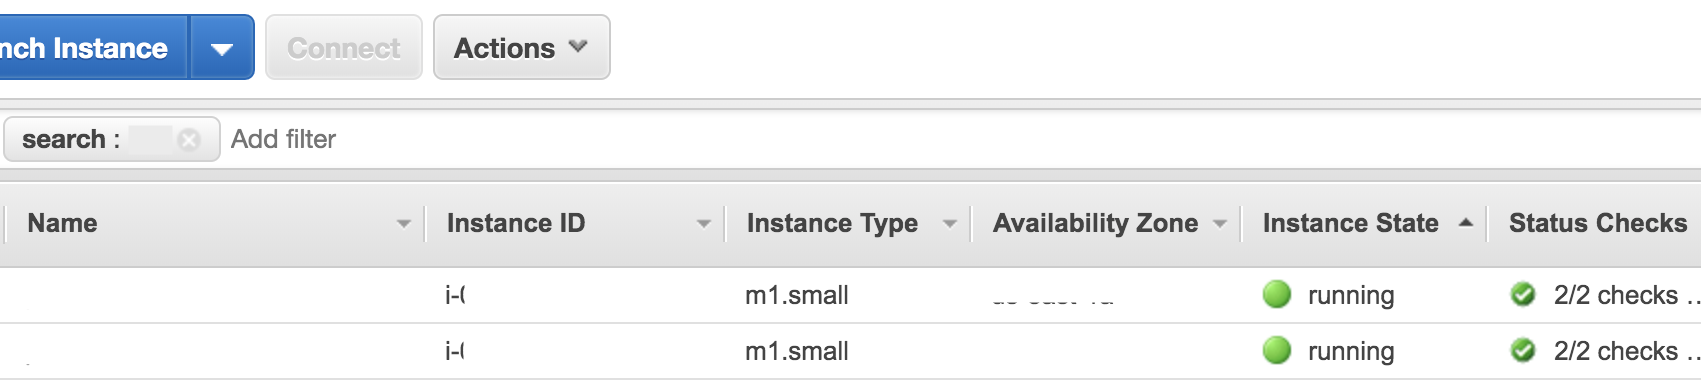
AWS EC2 Console
You can send messages to your worker queue beyond the threshold to trigger auto scaling to spawn a new worker instance. When that happens, you can search for your worker environment name on AWS EC2 console and there should be a new instances added.
You can also stop sending messages to your worker queue so that its size goes below lower threshold and thus, one or multiple worker instances will be terminated.
AWS EB CLI
You can run eb health command to see your worker environment health. In the environment health chart, you can see number of instances running.
AWS CLI
You can run aws elasticbeanstalk describe-instances-health command to see how many instances running for an Elastic Beanstalk worker environment.
$ aws elasticbeanstalk describe-instances-health --environment-name envNames
{
    "InstanceHealthList": [
        {
            "InstanceId": "i-0e7201516e9a120fa"
        },
        {
            "InstanceId": "i-0278ca301516e9ae68"
        }
    ]
}
Summary
It makes more sense to scale your worker instances based on worker queue size instead of other metrics such as CPU utilization.
Check out How to pause or stop AWS Elastic Beanstalk Environment Instance if you would like to know how to pause an Elastic Beanstalk environment instance temporarily.
Support Jun
Thank you for reading! ![]() Support Jun
Support Jun
If you are preparing for Software Engineer interviews, I suggest Elements of Programming Interviews in Java for algorithm practice. Good luck!
You can also support me by following me on Medium or Twitter.
Feel free to contact me if you have any questions.


Comments